Along with doing what I can to keep water on my property, I compost most garden and food waste.
Compost – naturally decomposed organic material – improves soil structure, enhancing its ability to hold air and water, yet drain well.
It is not fertilizer. Fertilizer is like vitamins. You can’t live on vitamins.
Compost is food – for the soil and all the life within it.
Solutions that address several problems at once appeal to me. Especially when simply changing perspective turns waste into valuable resource.
Why expend carbon-based energy to transport and process yard and household “waste” some place “away” – (to somebody else’s neighborhood)?
I can close that energy loop right here at home by making compost, which I also pay good money for – there’s never enough.
At first I hid a makeshift wooden bin behind a boulder up the back slope. Lots of excuses to not take stuff up there when it’s hard to get to.
In my younger days, I dreamed of having a big, nicely designed three-bin compost setup. But where would I put it?
The only accessible flat land on my breakneck mountain is a small bit right out front. I’d rather look at plants.
I don’t have the strength, energy or time to do it by the book, and I’m not importing or generating truckloads of materials.
As an old friend once said, “Pile it up somewhere, everything rots sooner or later.”
And as the bumper sticker says, “compost happens.” It just takes time, microbes, water and organic matter.
The earnest black recycled plastic compost container given out on Earth Day filled up too fast – and it looked very ugly sitting out in my yard.
A square mail-order wire bin bulged out when full and fell apart.
Being a lifelong scrounger, I knew I’d find a good use for the roll of sturdy coated welded wire mesh fencing somebody left in our transfer station recycling area.
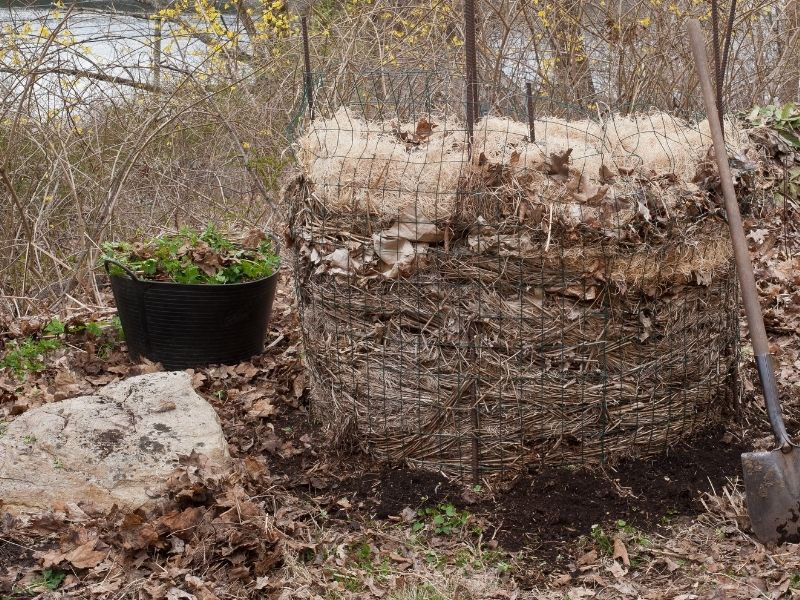
It was just what I needed to make a simple, inobtrusive, compost bin that takes up very little space, isn’t painful to look at and does the trick.
Make a wire fence compost bin
- Unroll enough of the coated wire fencing (not raw galvanized) to make a circular enclosure, whatever size suits you. My fencing was 4′ wide with a 2 x 3″ mesh, so that’s what I used; 4′ across seemed about right for the amount of material I generate.
- 5′ wide fencing would work fine too, or a smaller mesh size. Stuff would fall through larger openings.
- Cut what you need off the roll using heavy-duty wire cutters. I left long ends of the horizontal wire to bend over and fasten the ends of the fencing together – and cut my hand open, right through gloves. Take it from me – cut the wire close and tie up with non-biodegradable twine or more flexible wire.
- Weave pieces of ½” rebar in a few places down through the mesh, spacing them around the perimeter. Pound rebar into the ground to stabilize the structure. Five 5′ pieces were sufficient for my bin.
- Anchor a piece of perforated pipe upright in the center with another piece of rebar. That lets air infiltrate the center of the pile, so you don’t have to turn it. (Next time I’ll make a small-diameter wire cylinder instead, having since learned that PVC is not up to organic standards).
- Line the enclosure with stringy plant stems, small flexible branches, packing excelsior, straw, ornamental grass clippings, even tightly-rolled brown paper bags, whatever comes to hand that doesn’t break down fast, as it becomes available. You could weave vines in and out to dress it up and downplay the wire fencing.
That’s it. Pressure from materials inside the circular enclosure is distributed evenly, so it doesn’t bulge, even when full to the top. The rebar keeps it standing up straight.
Fill the bin little by little. Layering happens naturally as you pull weeds and dead plants, do garden cutbacks, clean leaves out of gutters and toss kitchen scraps.
Keep building up the lining of slower-to-degrade materials as you go to keep it all contained.
Time and microbes do their work, and finished, crumbly compost spills out the bottom even as you add fresh materials to the top.
It might not be the best, most scientifically correct compost in the world, but it’s been more than 10 years of zero effort – and my plants love it.
What to compost
Brown stuff
- Dried leaves
- Wood shavings, a dash of sawdust
- Dead plants
- Clumps of grass allowed to dry out on the lawn after mowing if it’s too thick to leave in place
- Last year’s dried ornamental grasses
- Torn up paper towel and toilet paper rolls, used coffee filters
- Torn up newspapers, brown paper bags, corrugated cardboard
Green Stuff
- Carrot tops, vegetable peelings, rotting fruit, watermelon rinds (cut up)
- Bolting lettuce
- End of season vegetable garden cleanup, if disease-free
- Weeds without viable seeds or aggressive rhizomes
- Green grass
- Coffee grounds and spent tea leaves
- Old bouquets
- Past-its-prime food that is not dairy or meat
Plus eggshells crushed into small pieces. They don’t break down, but they add calcium that leaches out over time.
Layer greens and browns without letting any one item clump up.
Carbon-filled brown materials take a long time to decompose. Nitrogen-rich greens get things going, like adding fire to fuel.
If your compost isn’t decomposing, add more green materials.
If it smells, add more browns.
And every once in a while, toss a handful of what comes out the bottom on top of the pile, for enhanced microbial action.
